2022. 2. 20. 18:34ㆍiOS
UICollectionView를 이루고 있는 형태
CollectionView는 UIKit 에 있는 클래스로, 세가지 객체를 생성해서 만듭니다.
1. CollectionView
2. Layout
3. Datasource + delegate
아래 그림과 같이 collectionView는 중심에 위치하고 layout과 datasource는 collectionView에 적용시킵니다. 이 뜻은 다른 말로, layout과 delegate 없이는 collectionView를 만들 수 없습니다. (delegate는 optional임!)

Datasource는 collectionView에 들어갈 요소들과 보여줄 view를 생성합니다. Delegate는 collection view와 사용자간 소통을 돕는 객체입니다. 예를 들어, cell들을 선택하거나 눌렀을 때나 스크롤 할 때 등의 행위를 알려줍니다. Collection view layout은 layout attributes 객체를 생성하여 collection view에게 cell들을 어떤 식으로 배치시킬 것인지 알려줍니다. 여기서 중요한 점은 cell들의 배치!!!일 뿐!! cell들의 subview에는 관여하지 않습니다. (subview는 datasource에서 관여.) cell들의 배치를 정하려면 여러가지 계산이 필요하기 때문에 애플은 Flow layout을 만들었습니다.
CollectionViewFlowLayout?
UICollectionViewFlowLayout 은 collectionView의 layout을 쉽게 구성하기 위한 객체입니다. line-based layout이나 grid 형태의 layout 구현을 아아주 쉽게 해줍니다.
**여기서, cell과 item의 용어는 같습니다!!**
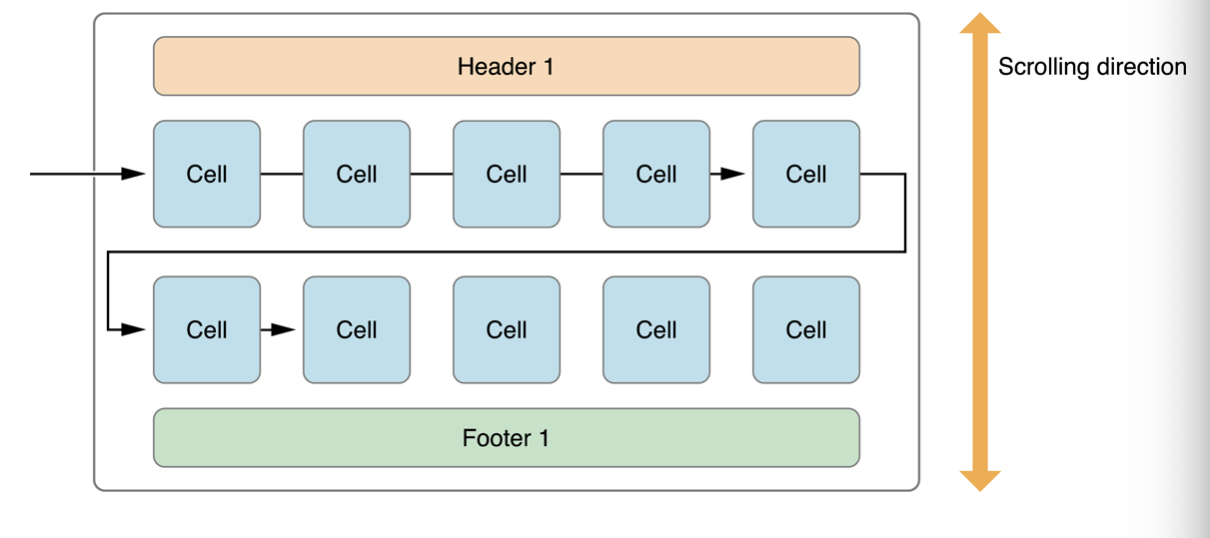
작동 방식은 아래와 같아요.
1. flow layout 객체를 생성하고 collectionVie에 적용시킵니다.
2. cell의 width와 height를 정해줍니다. (default는 0!! 이므로 꼭 정해줍니다.)
3. line과 item들의 간격을 정해줍니다. (필요하다면!)
4. section header와 footer가 필요하다면 그들의 크기를 정해줍니다.
5. scroll 방향을 정해줍니다.
이제 조금 더 자세하게 들어가볼게요.
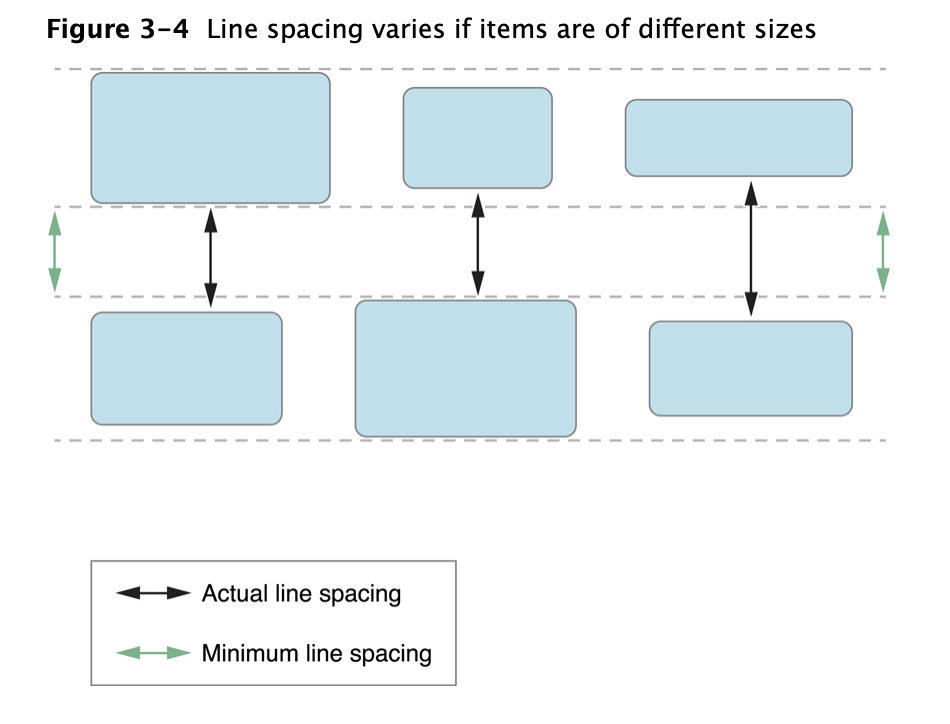
cell들의 item spacing이 저희가 지정해준대로 되지 않을 때가 많습니다. 그 이유는 아래 사진과 같습니다.

아이템들은 한 줄에 flow하게 배치가 됩니다. 아이템들이 딱 지정한 간격에 맞게 배치가 되면 너무 좋겠지만, 만약 조금이라도 줄에 여백이 생긴다면 그 여백을 없애주기 위하여 모든 배치의 item spacing을 늘려줍니다.
line spacing도 위와 마찬가지입니다! 한 줄의 height는 아이템 중에서 가장 큰 높이를 가진 아이템의 height가 되고 이를 기준으로, spacing을 주기 때문에 실제로는 더 클 수 있습니다.
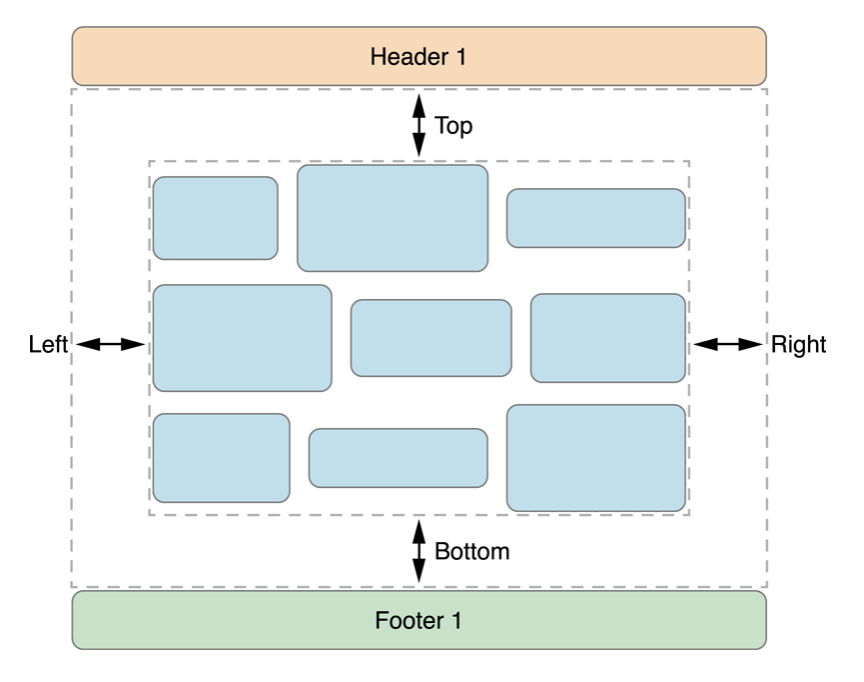
그리고 footer와 header를 잘 사용하지 않아서 이런 요소가 있는 지 몰랐는데 layout에는 sectionInsets라는 요소가 있더라구요.
collectionView 전체에 inset을 줄 수 있는 contentInset과는 다르게 section마다 inset을 줄 수 있습니다.
UICollectionViewFlowLayout을 subclass해서 layout을 구성해야하는 상황들
1. footer나 header말구 새로운 supplementary나 decoration view를 추가하로 싶을 때
2. flow layout에서 반환되는 layout attribute을 이용하여 layout을 조절하고 싶을 때
3. cell이나 view에 새로운 attribute를 추가하고 싶을 때
4. item이 추가되거나 삭제될 때 초기 또는 마지막 위치를 특정하고 싶을 때
이런 상황들일 때 custom해야 팁들에 대해선 애플 문서에 들어가서 보시면 됩니다. 옆 링크 knowing when to subclass the Flow Layout에 나와 있어요.
Custom Layout ??
collectionView의 custom layout을 만드는 방법은 2가지가 있습니다.
1. UICollectionVIewFlowLayout을 subclass하여 구현하기
2. UICollectionViewLayout을 subclass하여 구현하기
2번 상황일 경우에는 flow layout으로 구성하기 어려울 경우에 사용합니다.
예를 들어, grid나 line-based layout이 아닐 경우, scroll 방향이 상하/ 좌우 2가지일 경우 등
UICollectionViewLayout을 통해 layout을 구성하기 위해서는 2가지를 구현해주어야 해요.
1. 스크롤 가능한 content area의 크기
2. 각 cells와 views의 attribute 객체
이 2가지를 생각하면서 작동방식을 살펴봅시다.
1. prepareLayout 메소드에서 layout 정보들을 계산해줍니다!
2. collectionViewContentSize는 1번에서 계산해준 정보들을 이용해 content area의 크기를 정해줍니다.
3. layoutAttributesForElementsInRect 메소드에서는 cells와 views가 나타나게 될 rect에 들어간다면 해당 attrbute들을 반환해줍니다.

하나씩 살펴보겠습니다.
prepare()
prepare 메소드에서 각 cell의 attribute을 계산해줍니다. 그리고 다시 계산하지 않도록 자료구조(캐시)에 저장합니다. 또한 content size도 함께 계산해줍니다. layout을 커스텀하는데 꼭 필요한 메소드는 아니지만 미리 계산해주어 성능을 높이는데 사용할 수 있습니다.
collectionViewContentSize
스크롤을 할 content size를 반환해줍니다. prepare에서 계산한 값을 반환해도 좋고 바로 계산해주어도 됩니다.
layoutAttributesForItem(at indexPath: IndexPath)
보여지는 cell들에 대한 attribute를 반환합니다. 이것도 마찬가지로 미리 계산해서 저장해놓은 자료구조에서 반환해줄수도 있고 바로 계산해도 좋습니다.
layoutAttributesForElements(in rect: CGRect)
아래 사진의 visible rect 범위의 cell들에 대한 attibute를 반환합니다. 여러가지 cell들이 있어 배열로 반환됩니다. 반환되는 값들은 위와 동일합니다.

이렇게 만든 layout은 collectionView에 아래와 같이 할당해주면 적용됩니다. 생성할 때 적용시켜도 되고 이후에 적용시켜도 돼용

Custom Layout을 더 재밌게 만드는 방법에 대해서는 이 링크에 가보시면 됩니다!
Custom Layout을 만드는 팁들은 아래와 같아요.
- prepare 메소드에서 attribute을 계산하고 생성해서 저장하는 것을 고려하세요.
- UICollectionView를 subclass하는 것을 비추합니다. collectionView는 그것만의 appearance를 가지고 있지 않습니다. 대신에datasource나 layout을 이용해서 커스텀하는 것을 고려하세요.
- layoutAttributesForElementsInRect메소드에서 collectionView의 visiblecells 메소드를 절대로 호출하지마세요. 이건 단지 layout한테 물을 것을 먼저 묻는 것과 똑같은 행위입니다.
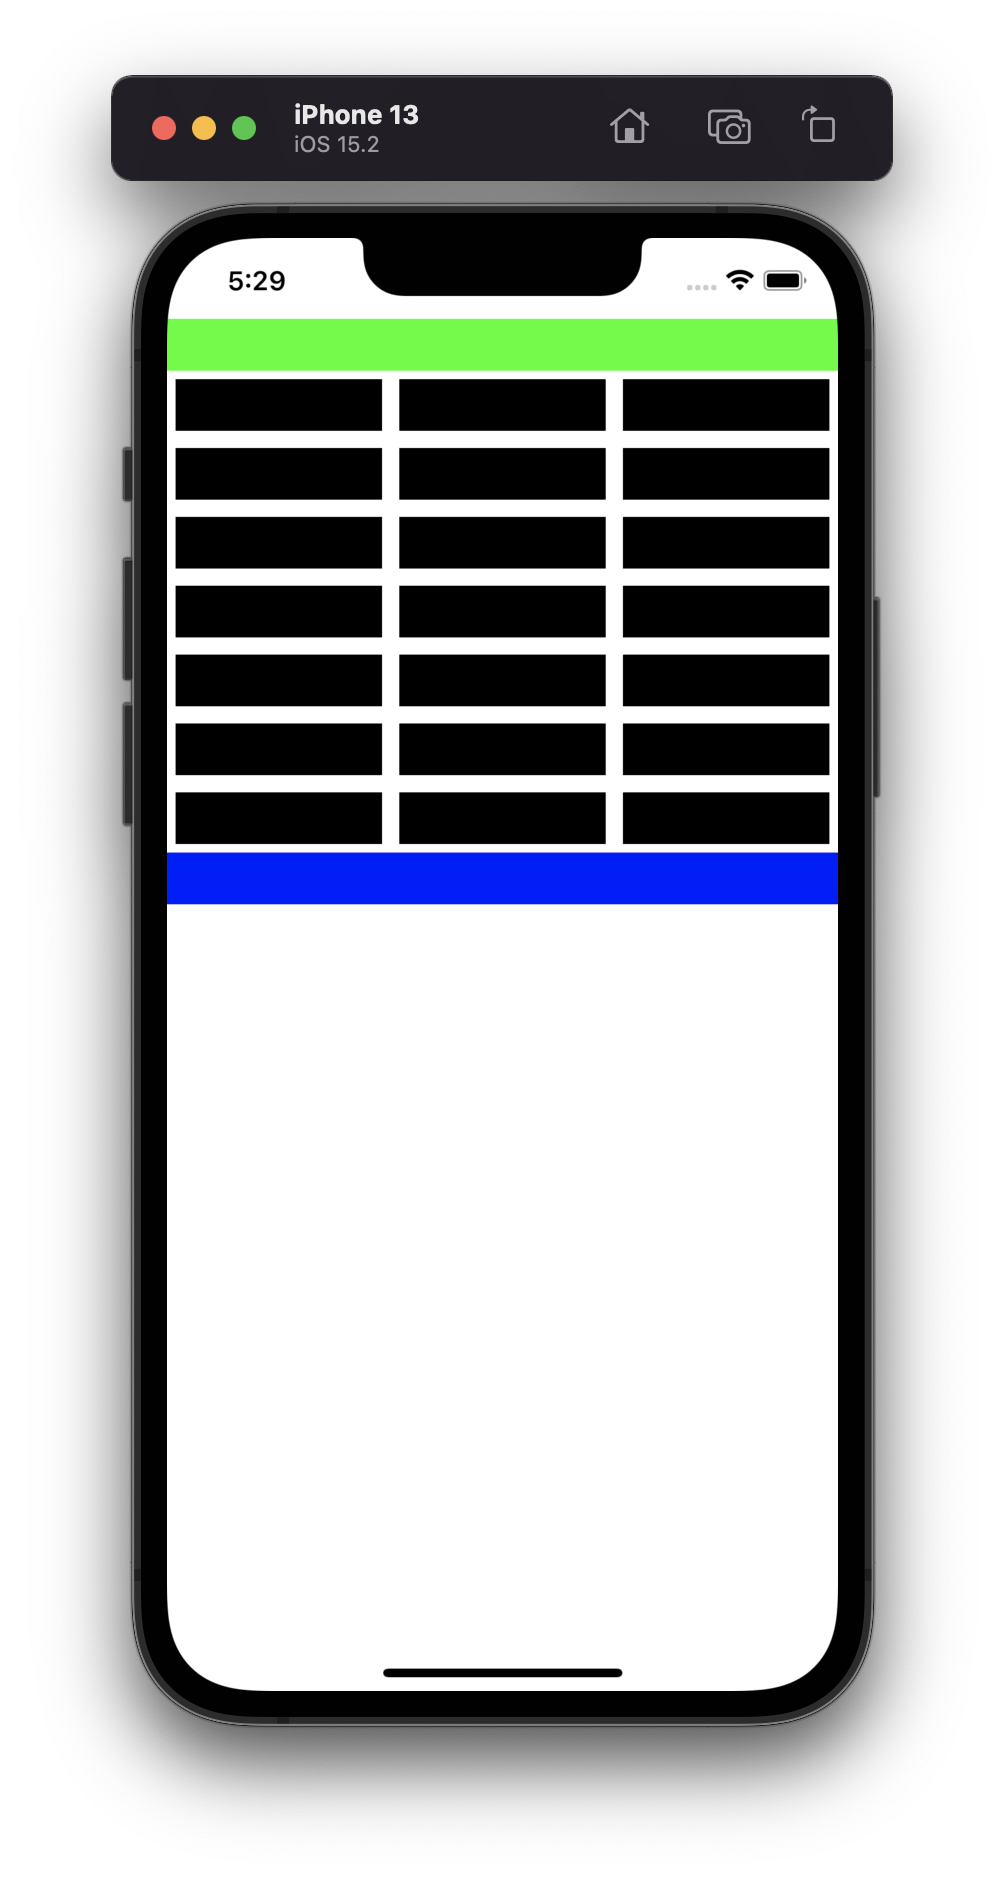
적용
애플 예제에서 어떻게 만들었는 지 살펴볼게요.
import UIKit

enum MosaicSegmentStyle {
    case fullWidth
    case fiftyFifty
    case twoThirdsOneThird
    case oneThirdTwoThirds
}

class MosaicLayout: UICollectionViewLayout {

    var contentBounds = CGRect.zero
    var cachedAttributes = [UICollectionViewLayoutAttributes]()

    /// - Tag: PrepareMosaicLayout
    override func prepare() {
        super.prepare()

        guard let collectionView = collectionView else { return }

        // Reset cached information.
        cachedAttributes.removeAll()
        contentBounds = CGRect(origin: .zero, size: collectionView.bounds.size)

        // For every item in the collection view:
        //  - Prepare the attributes.
        //  - Store attributes in the cachedAttributes array.
        //  - Combine contentBounds with attributes.frame.
        let count = collectionView.numberOfItems(inSection: 0)

        var currentIndex = 0
        var segment: MosaicSegmentStyle = .fullWidth
        var lastFrame: CGRect = .zero

        let cvWidth = collectionView.bounds.size.width

        while currentIndex < count {
            let segmentFrame = CGRect(x: 0, y: lastFrame.maxY + 1.0, width: cvWidth, height: 200.0)

            var segmentRects = [CGRect]()
            switch segment {
            case .fullWidth:
                segmentRects = [segmentFrame]

            case .fiftyFifty:
                let horizontalSlices = segmentFrame.dividedIntegral(fraction: 0.5, from: .minXEdge)
                segmentRects = [horizontalSlices.first, horizontalSlices.second]

            case .twoThirdsOneThird:
                let horizontalSlices = segmentFrame.dividedIntegral(fraction: (2.0 / 3.0), from: .minXEdge)
                let verticalSlices = horizontalSlices.second.dividedIntegral(fraction: 0.5, from: .minYEdge)
                segmentRects = [horizontalSlices.first, verticalSlices.first, verticalSlices.second]

            case .oneThirdTwoThirds:
                let horizontalSlices = segmentFrame.dividedIntegral(fraction: (1.0 / 3.0), from: .minXEdge)
                let verticalSlices = horizontalSlices.first.dividedIntegral(fraction: 0.5, from: .minYEdge)
                segmentRects = [verticalSlices.first, verticalSlices.second, horizontalSlices.second]
            }

            // Create and cache layout attributes for calculated frames.
            for rect in segmentRects {
                let attributes = UICollectionViewLayoutAttributes(forCellWith: IndexPath(item: currentIndex, section: 0))
                attributes.frame = rect

                cachedAttributes.append(attributes)
                contentBounds = contentBounds.union(lastFrame)

                currentIndex += 1
                lastFrame = rect
            }

            // Determine the next segment style.
            switch count - currentIndex {
            case 1:
                segment = .fullWidth
            case 2:
                segment = .fiftyFifty
            default:
                switch segment {
                case .fullWidth:
                    segment = .fiftyFifty
                case .fiftyFifty:
                    segment = .twoThirdsOneThird
                case .twoThirdsOneThird:
                    segment = .oneThirdTwoThirds
                case .oneThirdTwoThirds:
                    segment = .fiftyFifty
                }
            }
        }
    }

    /// - Tag: CollectionViewContentSize
    override var collectionViewContentSize: CGSize {
        print("collectionViewContentSize")
        return contentBounds.size
    }

    /// - Tag: ShouldInvalidateLayout
    override func shouldInvalidateLayout(forBoundsChange newBounds: CGRect) -> Bool {
        guard let collectionView = collectionView else { return false }
        return !newBounds.size.equalTo(collectionView.bounds.size)
    }

    /// - Tag: LayoutAttributesForItem
    override func layoutAttributesForItem(at indexPath: IndexPath) -> UICollectionViewLayoutAttributes? {
        print("layoutAttributesForItem")
        return cachedAttributes[indexPath.item]
    }

    /// - Tag: LayoutAttributesForElements
    override func layoutAttributesForElements(in rect: CGRect) -> [UICollectionViewLayoutAttributes]? {
        print("layoutAttributesForElements")
        var attributesArray = [UICollectionViewLayoutAttributes]()

        // Find any cell that sits within the query rect.
        guard let lastIndex = cachedAttributes.indices.last,
              let firstMatchIndex = binSearch(rect, start: 0, end: lastIndex) else { return attributesArray }

        // Starting from the match, loop up and down through the array until all the attributes
        // have been added within the query rect.
        for attributes in cachedAttributes[..<firstMatchIndex].reversed() {
            guard attributes.frame.maxY >= rect.minY else { break }
            attributesArray.append(attributes)
        }

        for attributes in cachedAttributes[firstMatchIndex...] {
            guard attributes.frame.minY <= rect.maxY else { break }
            attributesArray.append(attributes)
        }

        return attributesArray
    }

    // Perform a binary search on the cached attributes array.
    func binSearch(_ rect: CGRect, start: Int, end: Int) -> Int? {
        if end < start { return nil }

        let mid = (start + end) / 2
        let attr = cachedAttributes[mid]

        if attr.frame.intersects(rect) {
            return mid
        } else {
            if attr.frame.maxY < rect.minY {
                return binSearch(rect, start: (mid + 1), end: end)
            } else {
                return binSearch(rect, start: start, end: (mid - 1))
            }
        }
    }

}
...........................
엄청 길죠...
하나씩 살펴볼게요.
class MosaicLayout: UICollectionViewLayout {

    var contentBounds = CGRect.zero
    var cachedAttributes = [UICollectionViewLayoutAttributes]()
가장 먼저 CollectionViewLayout을 subclass한 MosaicLayout을 만들었습니다.
또 contentBounds와 attribute을 저장할 자료구조도 만들었습니다.
prepare 메소드입니다.

이미 cached처리된 attributes를 모두 지워주고 contentBounds도 초기화해줍니다. prepare메소드는 layout이 정해지기 전에 실행되는 메소드이기 때문에 새로운 아이템들이 추가되면 다시 계산해주어야 하기 때문입니다!
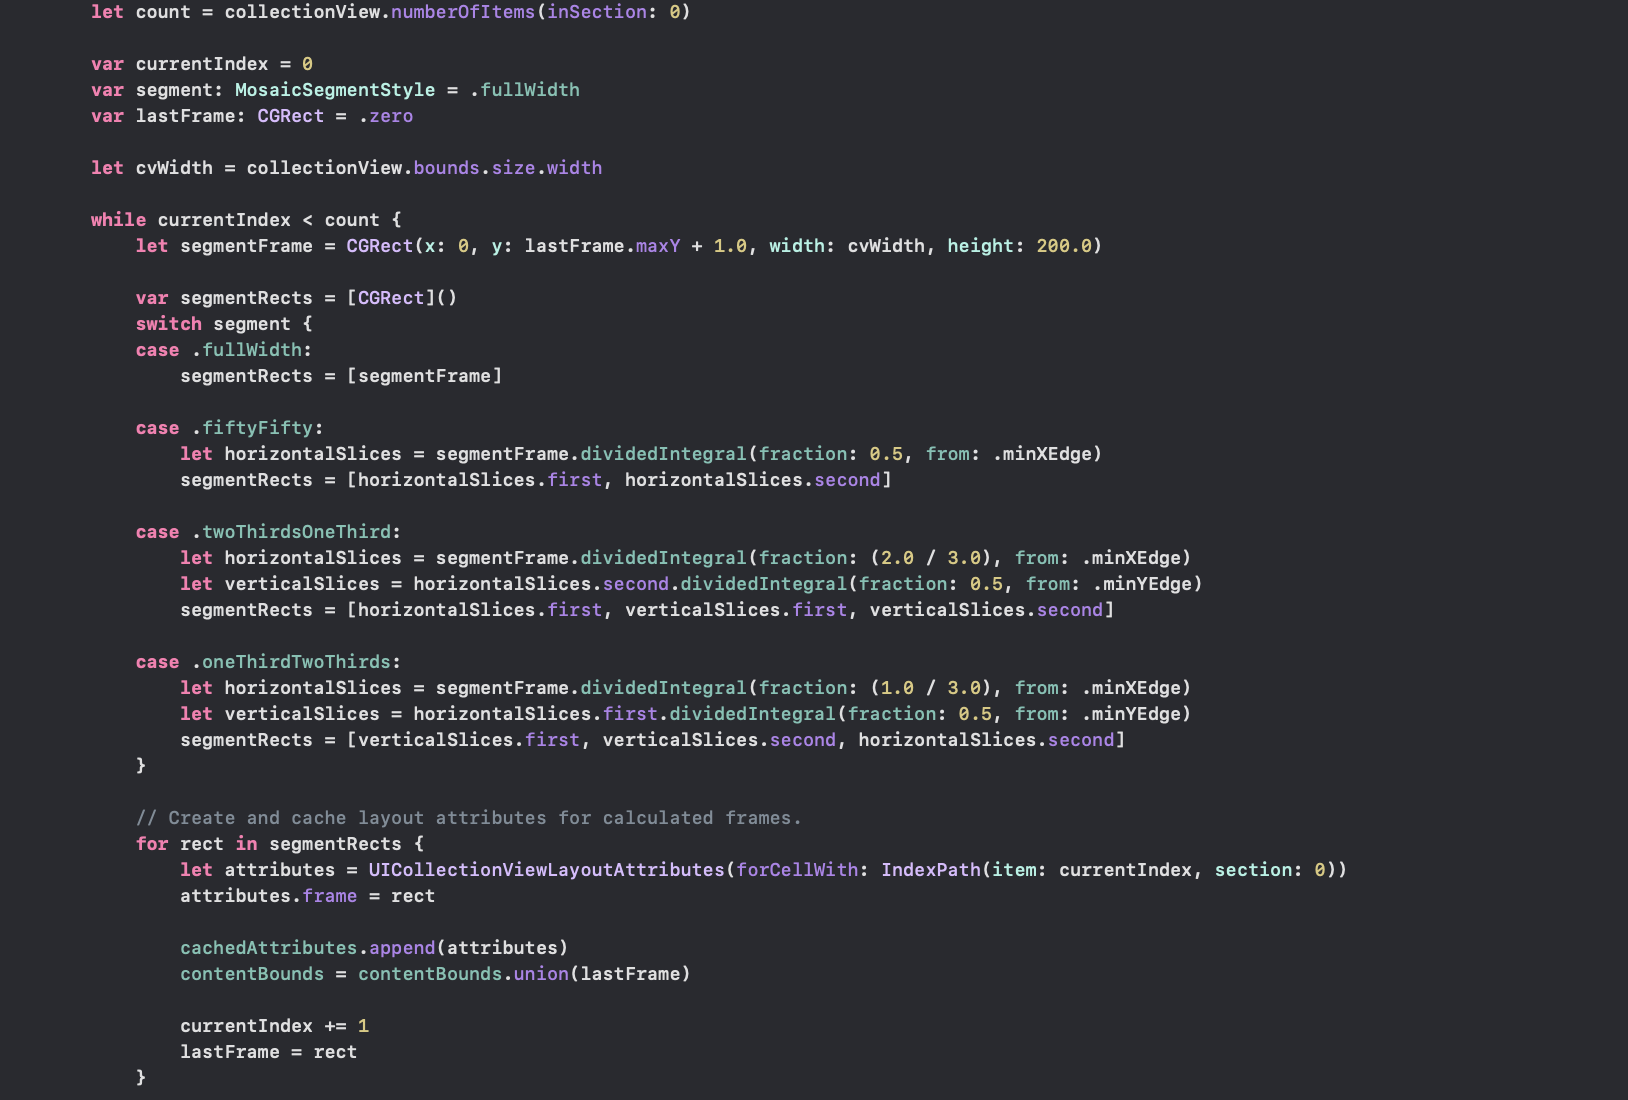
초기화가 되었다면 아이템들의 attribute과 contentBounds를 계산해주어야 합니다.
이 예제에서는 총 4가지 형태의 layout이 있기 때문에 segment라는 변수가 필요합니다.
count변수는 아이템의 개수,
currentIndex는 알아내야할 아이템의 indexPath
segment는 구성해야할 layout 종류
lastFrame은 다음 아이템의 frame을 시작점을 알기 위해 잠시 저장해둘 변수
cvWidth는 collectionView의 가로 길이
while문에서 일어날 일은 아래와 같습니다.
1. 해당 아이템의 frame구하기
2. 1번에서 구한 아이템의 frame으로 UICollectionViewlayoutAttributes을 생성해서 캐시 자료구조에 저장하기
3. 다음 아이템의 frame을 구하기 위해 이전 정보 저장히기
3번은 코드가 좀 길어서 생략했습니다.
collectionViewContentSize 프로퍼티입니다.

prepare메소드에서 계산한 contentBounds를 반환합니다.
shouldInvalidateLayout 메소드입니다.

새로 계산할 bound 크기가 기존 bound 크기와 같다면 invalidate하지 않습니다.
layoutAttributesForItem과 layoutAttributesForElements 메소드입니다.
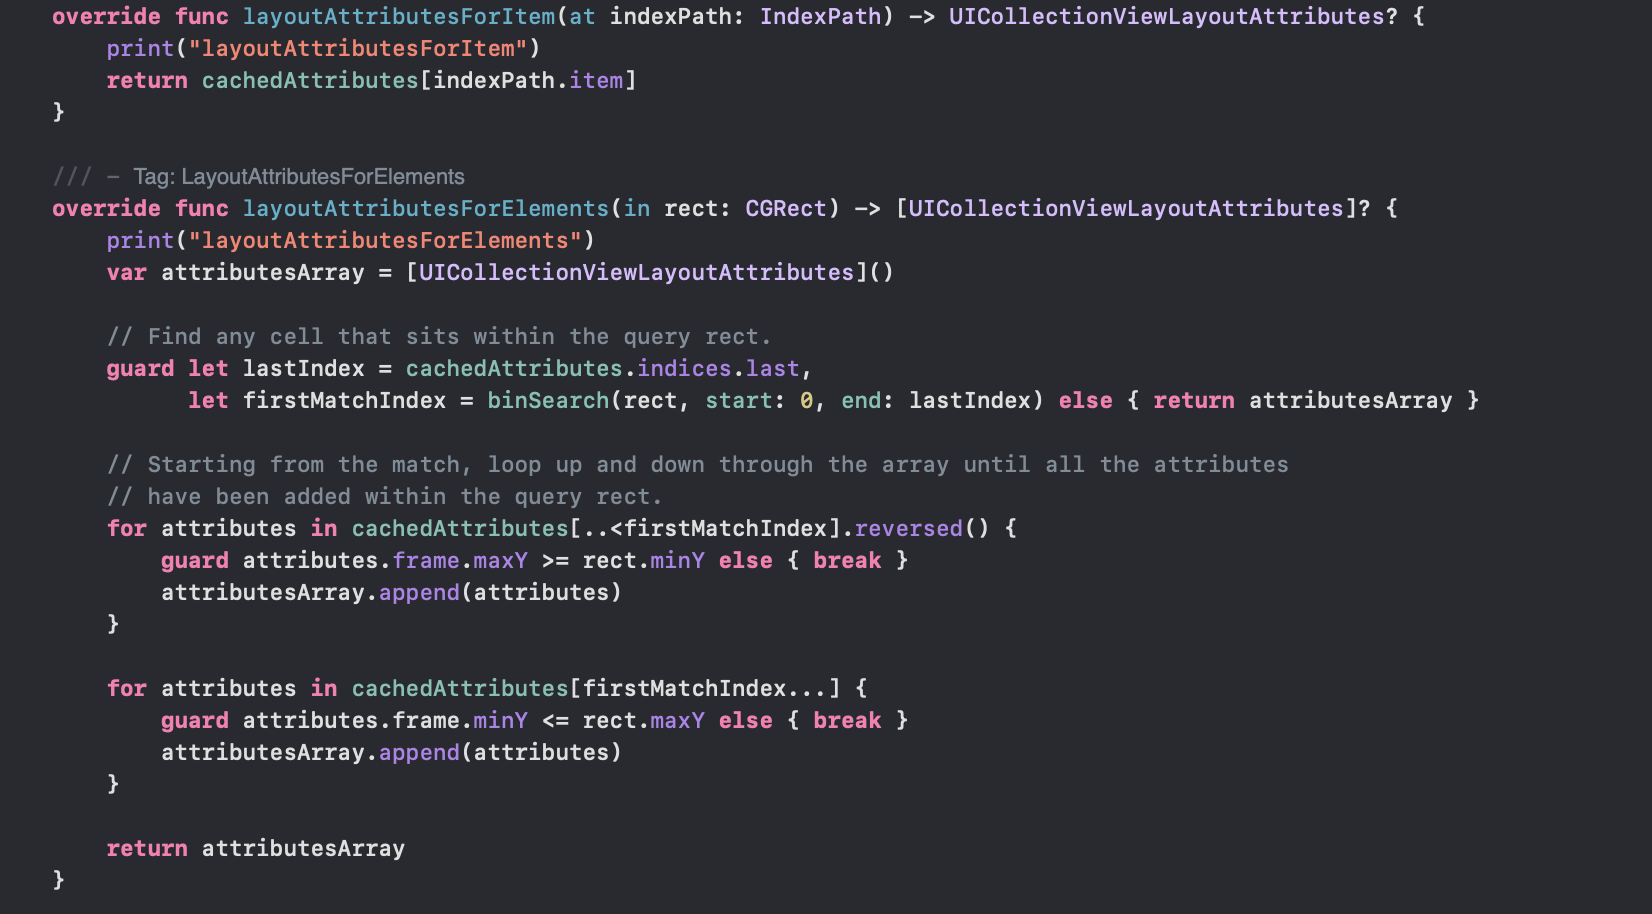
prepare 메소드에서 계산한 attribute를 반환합니다.
사실 이 두가지 메소드의 차이점을 알기위해서 print문을 찍어보았는데 layoutAttributesForItem은 처음 실행될때만 실행되고 스크롤할 때는 layoutAttributesForElements를 사용하더라구요. 아직 차이점은 잘 모르겠지만 모를 때는 두개 다 구현해주면 돼죠. 구현하더라도 나쁠 건 없으니.

결론
CollectionViewLayout은 정말 단순히 아이템의 배치를 계산하고 저장하고 있다가 필요할 때 collectionView에 제공해주는 역할을 합니다.
이게 귀찮은 작업이라 grid나 line-baesd 레이아웃인 FlowLayout가 나왔던 것입니다. 애플에서는 FlowLayout을 쓰는 것을 권장하지만, 이것만으로 디자인을 구성하기 어려울 경우에는 CollectionViewLayout을 subclass해서 사용하라구 합니다.
CustomLayout을 구현하기 위해서는 기본적으로 아래의 4가지 프로퍼티와 메소드를 구현해야합니다.
위에서 shouldInvalidateLayout에 대해서 언급하지 않았지만, 구현하면 매번 invalidate하지 않아도 되서 구현하는 것이 좋을 듯 해요.
open var collectionView: UICollectionView? { get }
open func layoutAttributesForItem(at indexPath: IndexPath) -> UICollectionViewLayoutAttributes?
open func layoutAttributesForElements(in rect: CGRect) -> [UICollectionViewLayoutAttributes]?
open func shouldInvalidateLayout(forBoundsChange newBounds: CGRect) -> Bool
그리고 추가적으로 아래의 메서드도 구현해주면 좋습니다.
open func prepare()SupplementaryView와 DecorationView도 구현하려면 아래 메소드도 구현해주어야합니다.
open func layoutAttributesForSupplementaryView(ofKind elementKind: String, at indexPath: IndexPath) -> UICollectionViewLayoutAttributes?
open func layoutAttributesForDecorationView(ofKind elementKind: String, at indexPath: IndexPath) -> UICollectionViewLayoutAttributes?
다음에 채팅방을 만들 때, 여러가지 시도해보면 좋을 듯 합니다!
'iOS' 카테고리의 다른 글
| [CoreAnimation] CAReplicatorLayer 알아보기 (0) | 2022.10.20 |
|---|---|
| 영문자로만 이루어진 String 알아내기 + String Index 쉽게 접근하기 (1) | 2022.08.16 |
| String Index (0) | 2022.01.15 |
| Swift로 입력 받기 (출력은 print, 근데 입력은..?) (0) | 2022.01.07 |
| [HIG] App Architecture (0) | 2022.01.06 |